Hello, people who still take time to read this blog!
I am done with Blogger/Blogspot... I am switching to GitHub Pages.
Worry not, the contents of this blog will stay here (as long as the Blogger platform exists, that is).
My new blog can be found at: https://ferrolho.github.io/blog/
Goodbye, World!
- henrique ferrolho
Difusal
Computers, Programming Tutorials and more!
Monday, April 23, 2018
Thursday, June 25, 2015
How to install Eclipse Mars 4.5 on Ubuntu
Installing Eclipse
- Download Eclipse from here
- Extract it and you will end up having a folder named eclipse
- Save it wherever you wish
- I saved mine in ~/Programs/eclipse
Adding a launcher shortcut
- Press CTRL+ALT+T to open Terminal
- Run the following commands:
- make sure you replace *eclipse path* with the location where you previously saved eclipse - in my case it is ~/Programs/eclipse/eclipse
- After these commands, gedit - Ubuntu's default text editor - should have opened
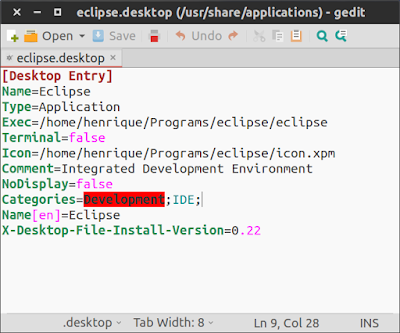
- Copy the following text and paste it there:
- You need to replace the Exec and Icon paths to the location where you previously saved eclipse
- Save the text file and close gedit
- A shortcut should have been successfully created
- You may have to log off and back in for it to show up
sudo ln -s *eclipse path* /usr/bin/eclipse
sudo gedit /usr/share/applications/eclipse.desktop
[Desktop Entry]
Name=Eclipse
Type=Application
Exec=/home/henrique/Programs/eclipse/eclipse
Terminal=false
Icon=/home/henrique/Programs/eclipse/icon.xpm
Comment=Integrated Development Environment
NoDisplay=false
Categories=Development;IDE;
Name[en]=Eclipse
X-Desktop-File-Install-Version=0.22

Wednesday, October 22, 2014
How to connect two virtual machines through a virtual serial port
Introduction
After this tutorial you will have set up two linux virtual machines connected through a RS232 virtual serial port.VirtualBox will be the program used to run the virtual machines and both of them will be running Lubuntu, which is a very light version of Ubuntu.
I will be using Ubuntu during this setup, but the process is very similar if you are using Windows.
If you are not interested in creating a virtual serial port using virtual machines, you can emulate a virtual serial port in ubuntu itself using socat with a command similar to the following:
sudo printf "Opening virtual serial port... Done.\nPress CTRL+C at any time to close it.\n"; sudo socat PTY,link=/dev/ttyS0 PTY,link=/dev/ttyS4; printf "\nClosing virtual serial port... Done.\n"
Install VirtualBox
First, you will need to install VirtualBox. Open a terminal - CTRL+ALT+T - and enter the following command:sudo apt-get install virtualboxAfter this, you should have successfully installed VirtualBox:

Get Lubuntu
As I said before, both virtual machines will be running Lubuntu. Download the iso here. Select the PC 64bits - Standard image disc (lower left button):
Creating two virtual machines
Open VirtualBox and create a new virtual machine:
Name it lubuntu1 and select the type Linux and version Other Linux (64-bit):

Press next without modifying anything else and finally press create.
Repeat the same process to create a second virtual machine but this time call it lubuntu2.
Installing Lubuntu on the virtual machines
Click on the first virtual machine settings and go to the storage tab. Press the disk icon with a green plus sign:
Select choose disk:

Browse to and select the lubuntu image disk (.iso) you downloaded:

There should appear a new entry on the Storage Tree now:

Press OK and repeat for the other virtual machine.
After you are done, go ahead and start both virtual machines: the Lubuntu setup should start. Follow the onscreen instructions to install Lubuntu on the virtual machines. When the installation finishes, shutdown both virtual machines.
Connecting the virtual machines with a virtual serial port
Open both virtual machine settings and browse to the Serial Ports tab.Modify the Port 1 settings as follows - notice that serial port settings differ from lubuntu1 to lubuntu2:


Testing the virtual serial port
After having set both serial ports, boot both virtual machines.In order to test the connection, install gtkterm on both machines by executing the following command:
sudo apt-get install gtktermAfter installing gtkterm, open a terminal on both machines and type:
sudo gtktermIf everything was set up correctly, as soon as you type anything on one terminal, the terminal on the other virtual machine should output what you typed.
Subscribe to:
Comments (Atom)


