Pages

Friday, August 22, 2014

[Minix][Tutorial 6] Adding a timer to a project

In this tutorial we will be adding a timer implementation to our project and making a rectangle move across the screen.

Adding the timer

Go ahead and add the timer implementation you have developed during class as well as i8254.h to the src folder. Do not forget to declare it in the Makefile.


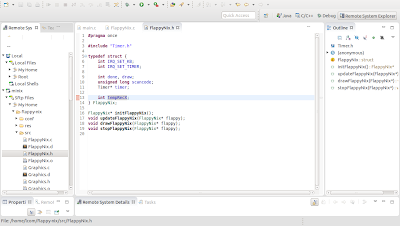
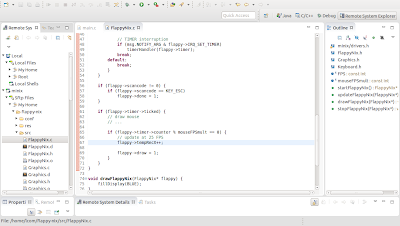
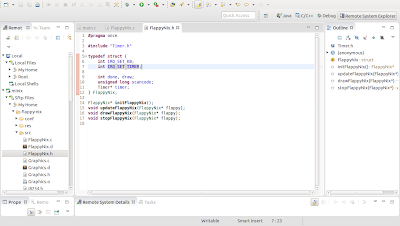
Now we need to declare that FlappyNix has a timer. I have added lines 3, 7 and 11 to FlappyNix.h:


We will have to modify the methods of FlappyNix.

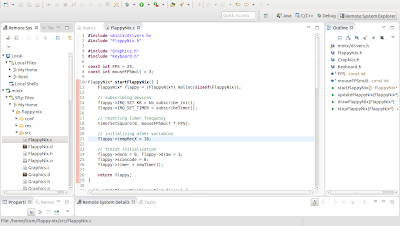
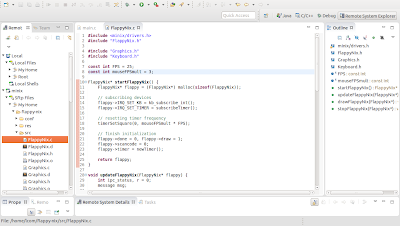
To start, I have added line 8: a const int represnting the mouse update FPS multiplier. What is that? It is an integer that multiplied by the FPS will determine the refresh rate of the mouse. Since FPS = 25 and mouseFPSmult = 3, the mouse position will be tracked at 25 * 3 = 75 FPS.
Regarding the start function, I have added lines 15, 18 and 23, which are responsible for subscribing timer interruptions, resetting the timer frequency and creating a new timer, respectively.


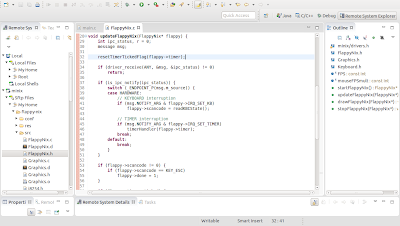
Regarding the update function, I have added line 32, which at every update, before registering any interruption, resets the timer tick flag.


Afterwards, from line 44 to 46, I check for a timer interruption and if there is one, I activate the timer->ticked flag and increment the timer counter - yes, that is exactly what the timerHandler() function does:
void timerHandler(Timer* timer) {
    timer->counter++;
    timer->ticked = 1;
}
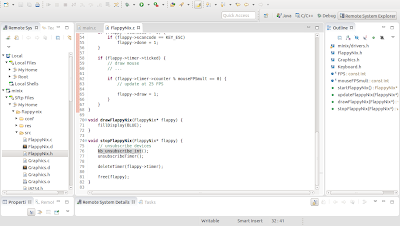
I have also added lines 58 to 67. Line 60 is where the mouse draw function call will be placed when we implement the mouse - 75 FPS. Inside this block, there is another block (lines 62 to 66) which is executed at 25 FPS. This block is where we are going to update our moving rectangle, but we will get there... Let's focus on planning the program's structure first.

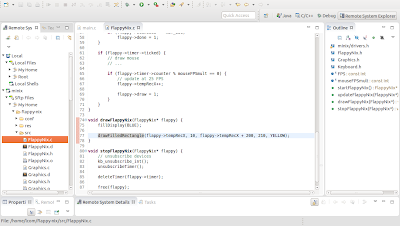
Moving on, I have not modified the draw function. I did modify the stop function though: I have added a call to unsubscribe the timer and to delete it afterwards, as you can see below.


Now is a good time to confirm the program is still able to run without any problems. Compile and run it. So far, although we have added a couple of lines, the program should do exactly the same: show a blue screen and terminate when the Esc key is pressed.

Is it still working? Good! Let's move on.

Making a rectangle move

Let's do some interesting stuff: draw a rectangle and make it move horizontally to the right. In order to do this, we will need a variable to save the location of the rectangle - line 13.


Now we need to initialize this variable! Let's make the rectangle start at x = 10 (line 21).


Let's edit the update function and make the x location of the rectangle increment every time - line 67.


Finally, let's draw a rectangle that starts at flappy->tempRecX with constant width and height of 200 pixels - line 77.


Side note: my drawFilledRectangle() function might be different from yours. If you don't understand mine, here is a quick explanation: it receives five arguments - the first two arguments are the x and y coordinates of the top left corner of the rectangle; the second two arguments are the x and y coordinates of the bottom right corner of the rectangle; the last argument is the color of the rectangle.

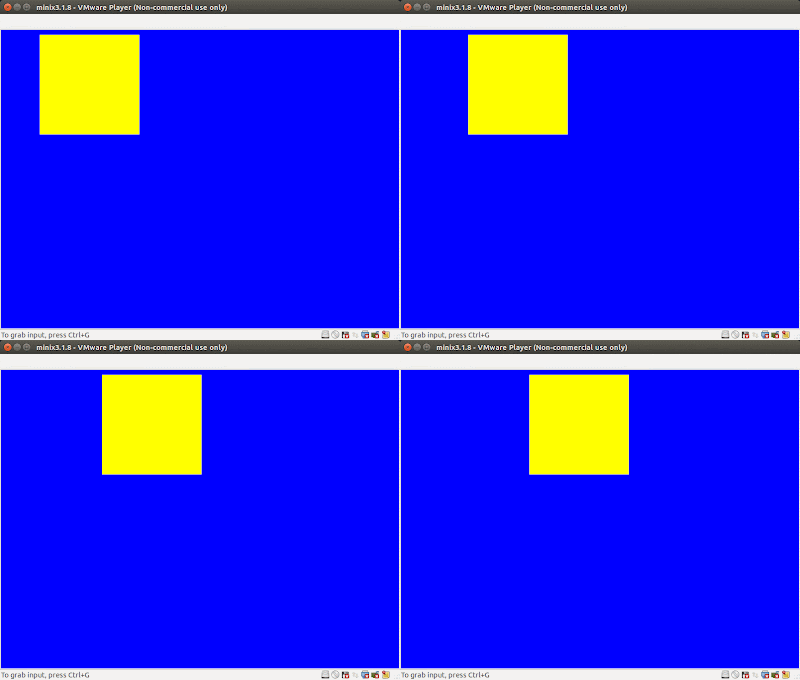
And that is it! Compile and run your program and you should see a rectangle moving to the right at constant speed! You should still be able to exit the program by pressing the Esc key on the keyboard. Pretty nice, right?


Back to index

Click here to go back to the index post.

[Minix][Tutorial 5] Adding keyboard input to a project

In the previous tutorial we've added a graphics library to our project. So far, when we run the program, a blue screen is shown for two seconds. In this tutorial we are going to add keyboard features to our program: when we run it a blue screen will appear and the program won't terminate until we press Esc on the keyboard.

Adding keyboard and KBC source code

During class, you should have developed functions to interact with the keyboard using the kbc. Now it is time to add these to our src folder and add them to the Makefile SRCS tag - I usually declare them by alphabetical order. Below is a screenshot with the changes I have made so far.


Introducing objects in C


As you might know, C++ is object-oriented, but C is not. But there is a way to make C programs resemble some object-oriented-like programming language. I think it is time for us to start implementing this in our project.

Let's create our main object, the engine of our application: flappy-nix. Create both FlappyNix.c and FlappyNix.h inside src.

After that, what should our "object" FlappyNix contain and represent?
It will have four methods any object should always have:
  • initialize;
  • update;
  • draw;
  • terminate.

It should also have three variables:
  • done - tells if the program is done/is going to terminate;
  • draw - a flag that tells the program needs to be redrawn;
  • scancode - whenever a keyboard key is pressed, this will contain the code of that key.

There will also be another variable: IRQ_SET_KB, which will be used to detect keyboard interruptions.

Here is what my FlappyNix.h looks like so far:


Now let's actually implement these methods in FlappyNix.c.

startFlappyNix()


Side note: notice I have declared a global const int FPS, which is the Frames Per Second at which the application will be redrawn once we implement the timer. For now, don't worry about it.

Regarding startFlappyNix(), this function returns a pointer to a FlappyNix "object".
First I allocate space for a new FlappyNix.
After that, I subscribe the keyboard to activate keyboard interruptions.
Then, I initialize the object variables.
Finally, I return the pointer to the newly created FlappyNix.

updateFlappyNix(FlappyNix* flappy)


This function should be familiar to you from the LCOM lectures. I'm not going to go into much detail about it: basically, we are checking for hardware interruptions. At the moment we are only registering keyboard interruptions and the code of the pressed key associated to that interruption (lines 32-34). Later we'll be adding code to this function in order to receive timer and mouse interruptions.
Afterwards, we check the scancode, and if it is different than zero, it means a key was pressed. We check if that key was the Esc key. If it was, we tell that the program is done! Easy, right?

Notice that, just like color names, I also have some key names - line 42 - because that way I don't have to remember every key code or check a table of codes, I just use the key name. As you can see below, I declared these names in Keyboard.h. You can use the snippet below the screenshot in your own projects, it contains every possible key of the keyboard and the respective key code.


Note: the KEY_UP macro presented in the picture above should make use of '&' instead of '|'.

/// Keys
typedef enum {
    KEY_NONE = 0x0000,
    KEY_ESC = 0x0001,
    KEY_1 = 0x0002,
    KEY_2 = 0x0003,
    KEY_3 = 0x0004,
    KEY_4 = 0x0005,
    KEY_5 = 0x0006,
    KEY_6 = 0x0007,
    KEY_7 = 0x0008,
    KEY_8 = 0x0009,
    KEY_9 = 0x000A,
    KEY_0 = 0x000B,
    KEY_APOSTROPHE = 0x000C,
    KEY_ANGLE_QUOTES = 0x000D,
    KEY_BKSP = 0x000E,
    KEY_TAB = 0x000F,
    KEY_Q = 0x0010,
    KEY_W = 0x0011,
    KEY_E = 0x0012,
    KEY_R = 0x0013,
    KEY_T = 0x0014,
    KEY_Y = 0x0015,
    KEY_U = 0x0016,
    KEY_I = 0x0017,
    KEY_O = 0x0018,
    KEY_P = 0x0019,
    KEY_PLUS = 0x001A,
    KEY_ACCENT = 0x001B,
    KEY_ENTER = 0x001C,
    KEY_L_CTRL = 0x001D,
    KEY_A = 0x001E,
    KEY_S = 0x001F,
    KEY_D = 0x0020,
    KEY_F = 0x0021,
    KEY_G = 0x0022,
    KEY_H = 0x0023,
    KEY_J = 0x0024,
    KEY_K = 0x0025,
    KEY_L = 0x0026,
    KEY_C_CEDILLA = 0x0027,
    KEY_ORDINAL = 0x0028,
    KEY_BACKSLASH = 0x0029,
    KEY_L_SHIFT = 0x002A,
    KEY_TILDE = 0x002B,
    KEY_Z = 0x002C,
    KEY_X = 0x002D,
    KEY_C = 0x002E,
    KEY_V = 0x002F,
    KEY_B = 0x0030,
    KEY_N = 0x0031,
    KEY_M = 0x0032,
    KEY_COMMA = 0x0033,
    KEY_DOT = 0x0034,
    KEY_MINUS = 0x0035,
    KEY_R_SHIFT = 0x0036,
    KEY_ALT = 0x0038,
    KEY_SPACE = 0x0039,
    KEY_CAPS = 0x003A,
    KEY_F1 = 0x003B,
    KEY_F2 = 0x003C,
    KEY_F3 = 0x003D,
    KEY_F4 = 0x003E,
    KEY_F5 = 0x003F,
    KEY_F6 = 0x0040,
    KEY_F7 = 0x0041,
    KEY_F8 = 0x0042,
    KEY_F9 = 0x0043,
    KEY_F10 = 0x0044,
    KEY_NUM = 0x0045,
    KEY_SCRLL = 0x0046,
    KEY_NUM_7 = 0x0047,
    KEY_NUM_8 = 0x0048,
    KEY_NUM_9 = 0x0049,
    KEY_NUM_MINUS = 0x004A,
    KEY_NUM_4 = 0x004B,
    KEY_NUM_5 = 0x004C,
    KEY_NUM_6 = 0x004D,
    KEY_NUM_PLUS = 0x004E,
    KEY_NUM_1 = 0x004F,
    KEY_NUM_2 = 0x0050,
    KEY_NUM_3 = 0x0051,
    KEY_NUM_0 = 0x0052,
    KEY_NUM_DEL = 0x0053,
    KEY_MINOR = 0x0056,
    KEY_F11 = 0x0057,
    KEY_F12 = 0x0058,
    KEY_NUM_ENTER = 0xE01C,
    KEY_R_CTRL = 0xE01D,
    KEY_NUM_SLASH = 0xE035,
    KEY_ALT_GR = 0xE038,
    KEY_HOME = 0xE047,
    KEY_ARR_UP = 0xE048,
    KEY_PGUP = 0xE049,
    KEY_ARR_LEFT = 0xE04B,
    KEY_ARR_RIGHT = 0xE04D,
    KEY_ARR_DOWN = 0xE050,
    KEY_PGDN = 0xE051,
    KEY_INS = 0xE052,
    KEY_DEL = 0xE053,
    KEY_WIN = 0xE05B,
    KEY_CNTX = 0xE05D,
    KEY_END = 0xE04F
} KEY;

drawFlappyNix(FlappyNix* flappy)


This one is pretty straight forward: we fill the display with the color blue.

stopFlappyNix(FlappyNix* flappy)


Here we unsubscribe the keyboard interruptions and free the memory allocated to the FlappyNix "object".

Updating the Makefile


Do not forget to update the Makefile each time you add a new source file!
I added a new line - line 8 - where, from now on, I will declare the source code of "objects" we create.

Improving main.c

Now comes the fun part: let's make use of everything we have been working on and see the results. Go to main.c and edit it according to the screen below.

First, declare and create a new FlappyNix object.
Then it is really simple: while flappy is not done do the following indefinitely:
  • Update flappy;
  • If flappy is not done and draw flag is active - draw flappy.
When flappy is done, the while cycle terminates and so we stop flappy. The rest of the code we already know.


Below is a snippet with the current content of main.c.
#include <minix/sysutil.h>
#include <minix/syslib.h>
#include <minix/drivers.h>

#include "FlappyNix.h"
#include "Graphics.h"

int main(int argc, char **argv) {
    srand(time(NULL));
    sef_startup();

    /*
     * -------------------
     * VESA graphics modes
     *      16-bit (5:6:5)
     * -------------------
     *   320×200 - 0x10E
     *   640×480 - 0x111
     *   800×600 - 0x114
     *  1024×768 - 0x117
     * 1280×1024 - 0x11A
     * -------------------
     */
    initGraphics(0x114);

    FlappyNix* flappy = (FlappyNix*) startFlappyNix();
    while (!flappy->done) {
        updateFlappyNix(flappy);

        if (!flappy->done) {
            if (flappy->draw)
                drawFlappyNix(flappy);

            flipMBuffer();
            flipDisplay();
        }
    }
    stopFlappyNix(flappy);

    exitGraphics();

    return 0;
}

Testing our project so far

It's time to test our program! Go to minix, browse to the project folder, compile and run the project.


If everything went well, when you run the program, a blue screen should appear and should only go away when you press the Esc key on the keyboard. And that terminates the program.

Back to index

Click here to go back to the index post.
Thursday, August 21, 2014

[Minix][Tutorial 4] Adding graphics to a project

In this tutorial we are actually going to start coding flappy-nix.

Important note

My goal with these tutorials is to help you and guide you through the development of a project and to give you advice and tips for the LCOM course. These guides ARE NOT a way for you to just easily skip the course. Therefore, I will demonstrate how to develop this project from scratch but I will not show you how to code the stuff you are supposed to do in class. Things like developing basic functions to write to the video memory, handle the timer, handle mouse clicks and keyboard presses are expected from you, and I will make use of these abstractions without showing you their source code.

Adding graphics

The first thing we are going to do is to add some graphics to our program! I will take into account that you already have developed your own graphics library during class.

You should have two files. I named mine Graphics.c and Graphics.h. As you might know, the .h file is where the functions are declared, where as in the .c the functions are actually defined.

You should have implemented the VESA BIOS Extensions during class as well. I implemented them in VBE.c and VBE.h.
You should also have a file named LmLib.h, which is provided in the class handout.

In addition to these, in every project I work, I usually define a Utilities.c and Utilities.h where I define some useful functions. Below is a screenshot of my Utilities current state, where is also visible the current content of the src folder. You should have all these files in there by now.


In this case, as you can see, I only defined three macros and a function to verify a file's existence. Pay special attention to these macros: you will find them really handy throughout LCOM. If you don't know what a macro is or do not understand what these specific macros are for, I strongly advice you to do a research on google for yourself.

Update Makefile

Do not forget to constantly update your Makefile: since we've added a lot of files to the src folder, you should declare the .c files after the SRCS label, otherwise the compiler will not know of their existence at compile time.

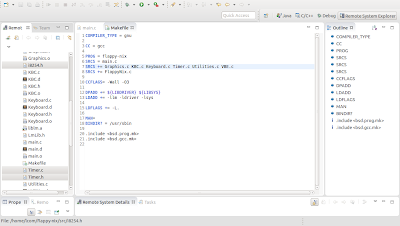
Below is my current Makefile. Notice that the new files have been declared at line 7.


Update main.c

Now that we have everything set, let's update main.c to make the program fill the display with the color blue for two seconds and then terminate. Here is how my main.c looks like:


You might be asking: What are all those functions? Where is fillDisplay() defined? Where is BLUE defined?
These are all functions I have developed. You might have developed functions which do almost the same thing but have different names. I will now give you some advice about them.

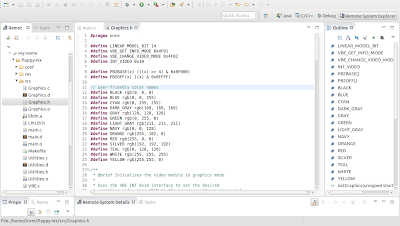
As you can see, I have color names! And they are VERY useful. I defined them in Graphics.h as preprocessor directives - look at the screenshot below. This is a nice way to easily access and pass colors to functions! It is a good idea for you to have them. You should notice though that they make use of the rgb() function, which you should implement.


The mouse buffer

I have also implemented two functions called flipMBuffer() and flipDisplay(). What are they used for? Well, it is something similar to a triple-buffer: I have three buffers: videoMem, mBuffer and buffer - flipMBuffer stands for flip mouse buffer and mBuffer stands for mouse buffer.

Here is how all it works: every graphics function I have defined writes to the buffer. So, say I call drawRectangle(), the function will modify the buffer. Everything except for the mouse is written there: when I call drawMouse(), that function copies the buffer to mBuffer and only then draws the mouse cursor directly in mBuffer. This enables me to update the mouse more frequently, because in order to draw the mouse cursor, I do not need to redraw every polygon of the entire scene, as long as the objects in the scene have not changed! I just copy the buffer to mBuffer again and draw the mouse cursor directly there. Do you get it? This way we can update the mouse more frequently and as a consequence, the mouse cursor movement will look much more fluid. After that, whenever I want to update the display with what has been written to the mBuffer, I just need to call flipDisplay(), which will copy the mBuffer to the video memory - the screen buffer, where we actually see the graphics.

Below is a draft with the logic behind all this.


Testing the program so far

To test the program, go to minix, browse to the project folder, compile the program and run it. There is no need to run sh install.sh again because we've already run it once; it is only necessary to run it again when we make changes to the res folder.


And this should be the result: a blue screen lasting two seconds.


Back to index

Click here to go back to the index post.
[Minix][Tutorial 3] Setting up a project with some useful scripts

In the previous tutorials we have set everything we need to develop programs for minix:
  • Minix running on a virtual machine through VMware Player;
  • Eclipse, with Remote System Explorer.
From now on, I think people following these tutorials will benefit more if I develop a project from scratch, so that is exactly what I am going to do.

In this tutorial I will help you to create and set a project. I will also teach you how to create some useful scripts which we will be using a lot during the project development.

So, let me think of a simple project which will be fun to develop... What about Flappy Bird? It makes use of graphics, keyboard, mouse to click the menu buttons, timer, and could easily use more stuff. I think it is a good idea! Let us start?

Create a new project folder

First of all launch Minix, you know the drill:

login: lcom
password: lcom

After logging create a new folder, this will be our project directory. I called mine flappy-nix.


Now open eclipse and open the RSE perspective. We already have a connection to minix which we created on the previous tutorial. If you open My Home (use the same login and password), the folder we have just created should be listed.


Create the project folder structure

Now is a good time to create our project folder structure. So go ahead and create the following folders through RSE:
  • conf - this will contain a configuration file needed to install the program
  • res - this folder will contain all the game resources, such as images
  • src - this is where our source code will be stored


Next, create main.c inside the src folder.


Create the Makefile

Also create the Makefile inside src.


The Makefile is like a set of rules to compile our project. It is a file with no extension, and has to be exactly named Makefile - with the first letter capitalized.
Paste the snippet below to your Makefile.
COMPILER_TYPE = gnu

CC = gcc

PROG = flappy-nix
SRCS = main.c

CCFLAGS= -Wall -O3

DPADD += ${LIBDRIVER} ${LIBSYS}
LDADD += -llm -ldriver -lsys

LDFLAGS += -L.

MAN=
BINDIR? = /usr/sbin

.include <bsd.prog.mk>
.include <bsd.gcc.mk>
Notice that PROG should have the same name as the project folder. You should also remember that every time you create a source file they should be declared in SRCS (only the .c files, not the .h). That's why SRCS = main.c. We will be adding more source files later.

We will also need a low memory library. Download it and drag it to the src folder.


Create amazing scripts

Trust me, scripts are great! They save a lot of time and typing. I will show you how to create three scripts you will fall in love with.

To create a script right-click the project folder, select New > File and then type the name of the script.

install.sh

This script does the following:
  • Installs the system configuration file required to execute it with the right permissions;
  • Copies the res folder to a safe and convenient destination;
  • Modifies the remaining scripts permissions.

Paste this snippet to install.sh:
cp conf/flappy-nix /etc/system.conf.d
mkdir /home/flappy-nix
cp -vr res/ /home/flappy-nix
chmod 777 compile.sh
chmod 777 run.sh

compile.sh

This script compiles the project. Paste the snippet below to compile.sh:
cd src
make clean install
mv flappy-nix ../
cd ..
strip --strip-all flappy-nix

run.sh

This script executes the project. Paste the following snippet to run.sh:
service run `pwd`/flappy-nix
After all these copy/pasting, you should have exactly what is shown on the picture below.


Why did we bother to create these scripts?
Well, because every time we need to compile our project (for example), instead of typing all the stuff we pasted to compile.sh by hand, we will just have to type: sh compile.sh! Isn't that great? You want to run the project? Easy! You just have to type: sh run.sh.

We need to do one more thing: create the system configuration file. This is a must!
Right-click the conf folder, select New > File and type flappy-nix. Then paste the snippet below.
service flappy-nix {
    system
        DEVIO
        IRQCTL
        UMAP
        INT86
        PRIVCTL
        READBIOS
        IOPENABLE
        ;
    ipc
        SYSTEM
        rs
        vm
        pm
        vfs
        ;
    io
        40:4      # Timer
        60        # KBC
        64        # KBC
        70:2      # RTC
        2f8:8     # COM2
        3f8:8     # COM1
        ;               
    irq
        0         # TIMER 0 IRQ
        1         # KBD IRQ
        3         # COM2 IRQ
        4         # COM1 IRQ
        8         # RTC
        12        # AUX/MOUSE IRQ
        ;       
    uid
        0
        ;
};


Finishing up

We have already done a lot during this tutorial! I think it is enough for now. So let's just check if everything is working as it should.

Open main.c and write a simple hello world program, such as the following:
#include <stdio.h>
int main(int argc, char **argv) {
    printf("Hello, minix!\n");
    return 0;
}
Now go to minix, go to the project folder and enter superuser mode by typing the command: su.

Then execute the scripts by the following order:
  • install.sh
  • compile.sh
  • run.sh

It should give an error, but that's ok for now as long as you see the "Hello, minix!" message.
Here is a screenshot of my output for comparison:


Killing a service

If for some reason you run your program again and you get something like:

Request to RS failed : Resource busy (error 16)

That means that the program did not finish correctly and it's service is still running in the background. To kill/stop it, just run the command:

service down name_of_the_service_to_be_killed

In our case, it would be:

service down flappy-nix

This will kill the service and thus enable you to run it again. But do not get away with it this way, you should look for what is causing the problem and fix it.
This is a very useful command for the entire development of the project.

Back to index

Click here to go back to the index post.
Monday, August 4, 2014

Manacher's algorithm: longest palindromic substring problem

In this post I'll try to explain Manacher's algorithm in a simple way. Manacher's algorithm is a solution for finding the longest palindromic substring of a given string.

A palindrome is a sequence of symbols or elements that reads the same forward or reversed.
Examples of a few palindromes:

radar    level    rotor    noon
abba    aba    b    xxx1y1xxx

Manacher's algorithm is a really good/fast solution for this problem since its time and space complexity is O(N).

Pre-process string S

The first step of the algorithm is to pre-process a given string S, into string T, by inserting a special character between every character of S and also at both ends. For the algorithm future convenience, a distinct special character should then be placed at both ends. This pre-processing is done just to handle both even and odd sized S strings gracefully.

If say, '#' is used as the main special character, these are some examples of the original strings and their resulting transformations:
S: abba     T: ^#a#b#b#a#$
S: a        T: ^#a#$
Now would be a good time to code this first step. Try to code it for yourself before seeing the snippet below, it should be pretty straight forward.
When you are done, compare your solution with the pseudo code below.
preprocessManacherAlgorithm(s) {
    if (s.length() == 0)
        return "^$";

    t = "^";
    for (i = 0; i < s.length(); i++)
        t += "#" + s[i];
    t += "#$";

    return t;
}

Process string T

After having pre-processed a given string S into string T, the next step is to process string T itself. To do that, an auxiliary array P with size equal to the length of T is required.

The content of the i-th element of P corresponds to the size of the maximum expansion to both sides of the i-th element of T in order to form a palindrome.

Was that too confusing? Look at the example below to better comprehend the purpose of P.


What is the longest palindromic substring contained in T? The answer is # a # b # a #, which has a length of 7 characters, right? Also notice that the character 'b', i = 4, is the center of the palindrome.

So, now the question is: how many characters of the palindrome are to the right or to the left of the palindrome's center? Or in other words: what is the size of the expansion to both left or right of the center character which makes up the palindrome?
The answer is 3. The image below illustrates this.


The goal is to populate P, and that task should now be easy.
The result is as follows:


Important note:
It is a good idea to have an auxiliary variable maxPalCenterID with the index of the highest value in P and update it while we populate P.

After having populated P, the longest palindromic substring is very easy to fetch from the original string S.

Since there is a special character at the start of T due to the pre-processing, and also another special character between every character of S, the palindrome start index is given by the formula below.
palStartID = (maxPalCenterID - 1 - P[maxPalCenterID]) / 2;
At this time, the longest palindromic substring has been found successfully, and though this is already a pretty good solution, it does not have a time and space complexity of O(N). In order to reach that complexity, there is a trick which Manacher's algorithm makes use of.

You should try to code by yourself the algorithm so far. Do not peek the snippet below. It is important that you try for yourself and only after compare your solution with the pseudo code below.
almostManacherAlgorithm(s) {
    t = preprocessManacherAlgorithm(s);

    n = t.size();
    P[n, 0]; // array of size n filled with 0

    maxPalCenterID = 1;
    for (i = 1; i < n - 1; i++) {
        while (t[i + 1 + P[i]] == t[i - 1 - P[i]])
            P[i]++;

        if (P[i] > P[maxPalCenterID])
            maxPalCenterID = i;
    }

    maxPalSize = P[maxPalCenterID];
    palStartID = (maxPalCenterID - 1 - maxPalSize) / 2;

    return s.substr(palStartID, maxPalSize);
}

Make it O(N)

Now that we have a functional algorithm, can it run faster? If yes, what can be done to make it run faster?

The trick resides in the symmetrical property of palindromes. Consider the following example, where C is the center of a palindrome and L and R are the left and right bounds, respectively.


Now populate P until R, the right bound of the palindrome with center in C.

Notice the symmetry? If there was a mirror at C, the content of P between L and R would be completely symmetric, just like it actually is! Check it for yourself below.


And now you might be thinking: we can save a lot of computations just by copying the half of a palindrome to the left of the center, mirror it, and pasting to the right! And then keep populating P after R with the same principle!

Go ahead and try that for yourself. Populate P based on this concept for C = 8. You should get something like this, which is wrong if you look carefully:


The right answer would be:


Well, that is still a great conclusion! Although it is not completely correct, you are very close to finding the trick!

As you may already be thinking, this concept works, but it fails at certain point. What is the limit?

If you examine a couple of more examples, this limit will be very easy to detect:
When P[i'] is less or equal to R-i, then P[i] is always equal to the minimum of these values: R-i or P[i']; Otherwise, the only valid information we have is that P[i'] is greater or equal to P[i], which is already a very valuable information! If this is the case, we just have to try and expand this palindrome to find P[i].

The final part that completes the trick is answered by the following question: when should C be updated? Again, if a few examples are examined by hand, it is not hard to find that:

Whenever a palindrome centered at i expands past the right bound of the palindrome centered at C (in other words, if it expands past R), C is assigned the value of i and R is updated according to the content of P[i] and i itself. Does that make sense? I really hope so! :)

And that is it! This concludes the beautiful Manacher's algorithm: a tool for finding the longest palindromic substring in O(N).

Now you just have to add these little extras to the previous code. Do not peek the snippet below. Once again, it is important that you try for yourself. Then you may compare your solution with the pseudo code below.
manacherAlgorithm(s) {
    t = preprocessManacherAlgorithm(s);

    n = t.size();
    P[n, 0]; // array of size n filled with 0
    C = R = 0;

    maxPalCenterID = 1;
    for (i = 1; i < n - 1; i++) {
        // i' = C - (i-C)
        ii = 2 * C - i;

        // save several computations
        P[i] = (R > i) ? min(R - i, P[ii]) : 0;

        // expand palindrome
        while (t[i + 1 + P[i]] == t[i - 1 - P[i]])
            P[i]++;

        // update index of the center of the biggest palindrome
        if (P[i] > P[maxPalCenterID])
            maxPalCenterID = i;

        // adjust center if palindrome
        // centered at i expands past R
        if (i + P[i] > R) {
            C = i;
            R = i + P[i];
        }
    }

    maxPalSize = P[maxPalCenterID];
    palStartID = (maxPalCenterID - 1 - maxPalSize) / 2;

    return s.substr(palStartID, maxPalSize);
}
You might be interested in checking this tutorial if you did not understand my explanation. I learnt this algorithm from there.